Employee Monitor Installing Via Group Policies
Installing
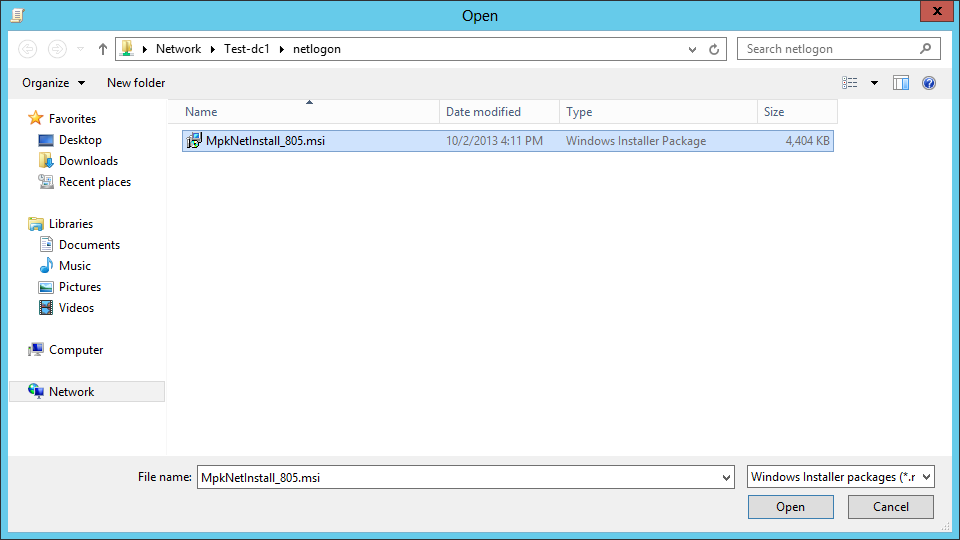
- Create a network installation point on your service. You can use the NETLOGON folder for this purpose.
- Copy
the installer files: MpkNetInstall.msi, key.bin and settings.bin. It is
recommended to join all destination computers into a single
organization unit and create a GPO for it.
- Open the group policy management window, use the right mouse button to select a group of computers or the domain itself, and click «Create a GPO in this domain, and Link it here».

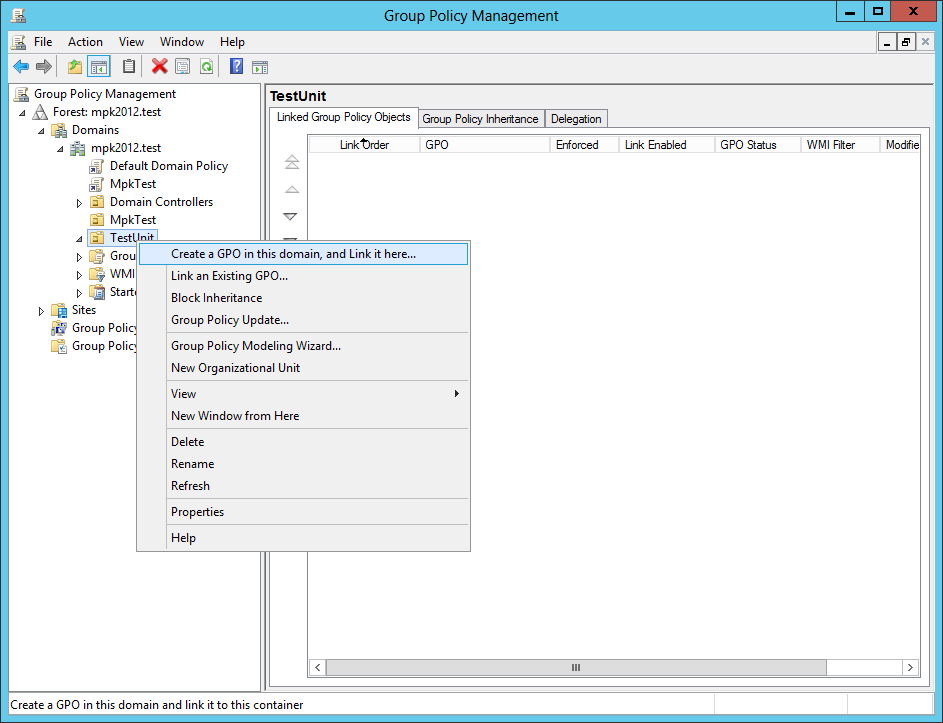
- Enter the policy name and click «OK».

- Right-click on the newly-selected policy and select «Edit…» from the menu.
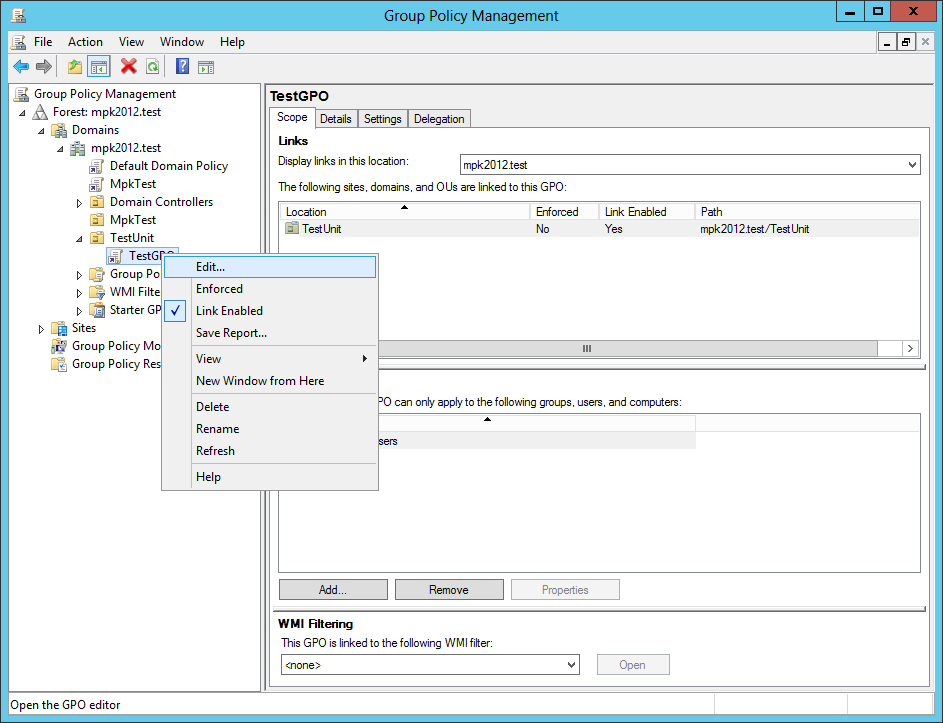
- Open the «Software Installation» menu, right-click on it and select the «Properties» menu item.
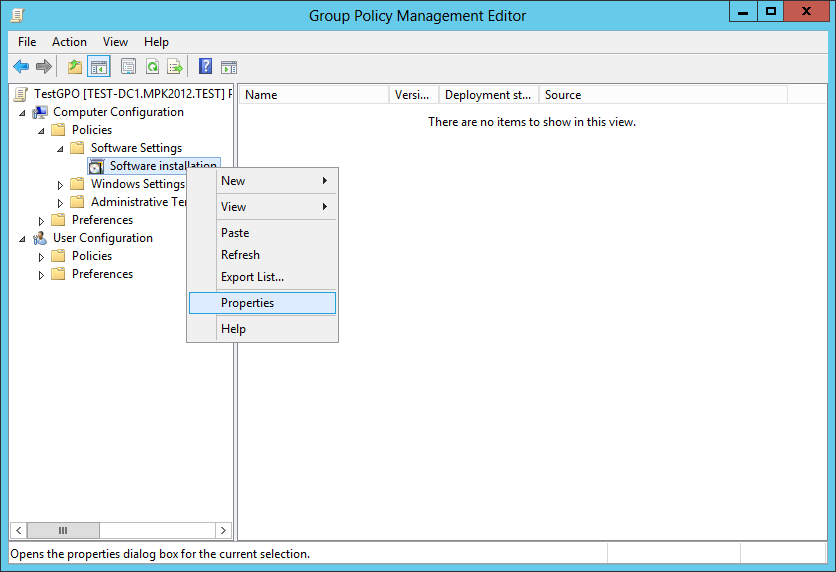
- On the first tab, select «Default package location» and set the property to «Assign» for new network packages.

- Right-click on the empty field and select a corresponding command for adding a new installation package.
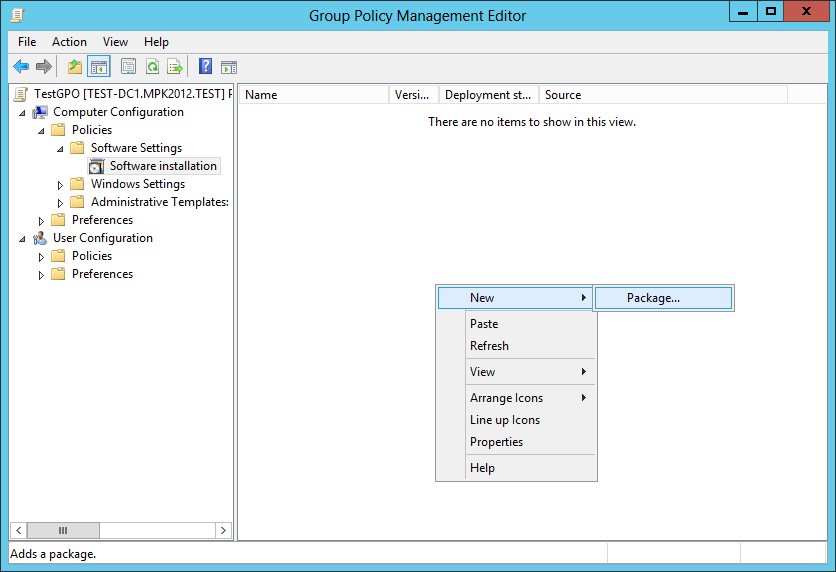
- Select the MkNetInstall.msi package from the default package location folder and click «Open».
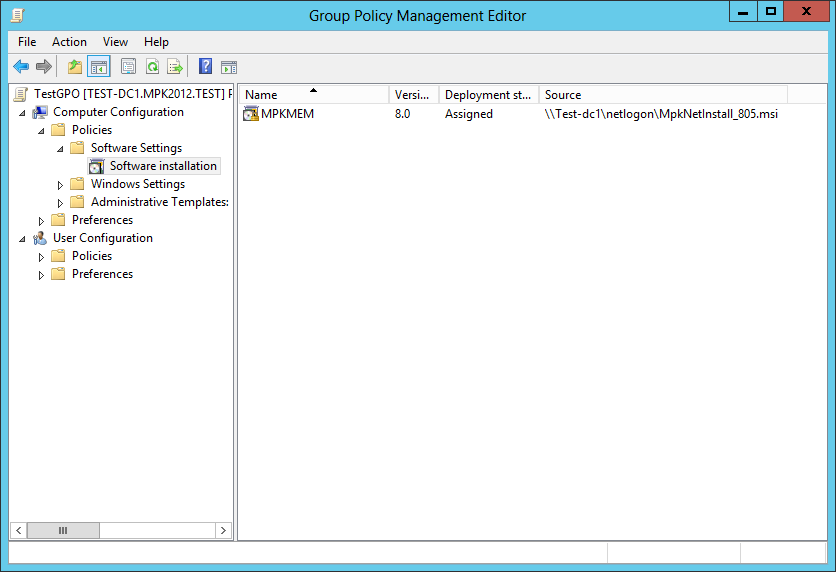
You can now close the policy management window.
- Run the gpupdate /force command to update the policies.

Upgrading
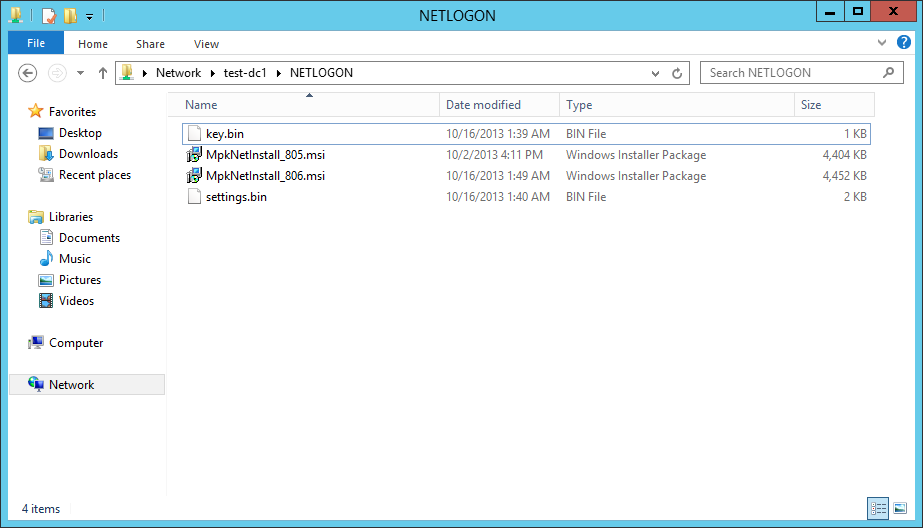
- Copy the new network installer to the distribution folder.
- Open the policy management window to install a network agent. Right-click on an empty field and use a corresponding command to install a network agent. Right-click on an empty field to add a new installation package.
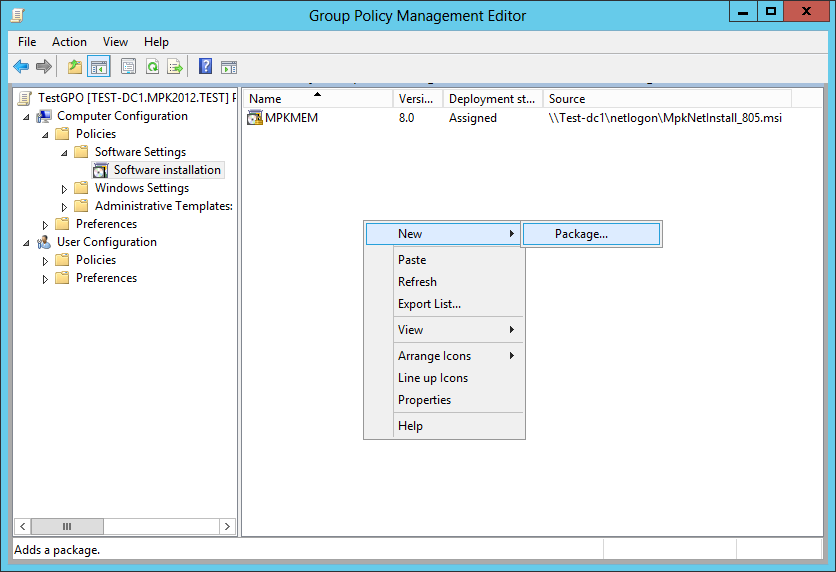
- Select the new version of the package and click «Open»

- Select the new version from the list of packages, right-click on it and select the «Properties» menu item.
- Switch to the «Upgrades» tab and click the «Add…» button.

- Select the previous version of the package in upgrade settings and enable the «Package can upgrade over the existing package» option, then click «OK».

- Click «Apply» and then «OK» in the upgrade settings window.
- Use the gpupdate /force command to update the policies.

Removing
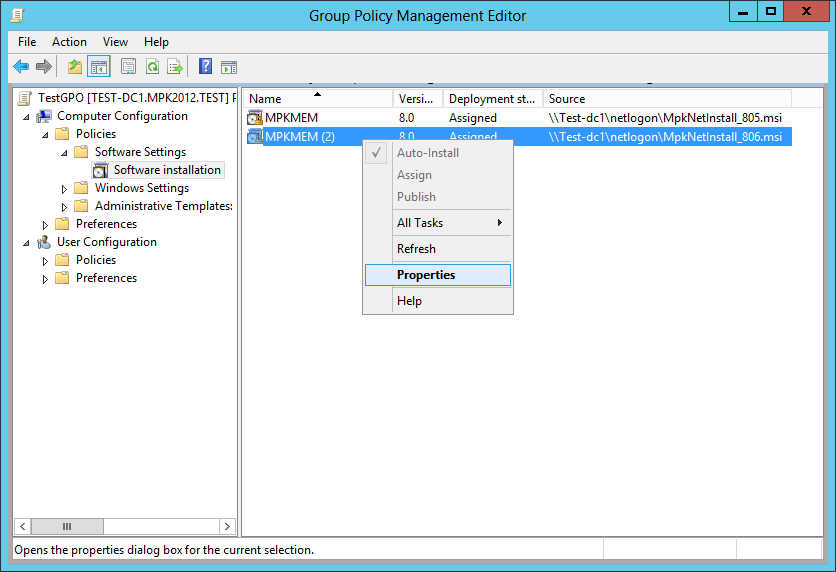
- Open the «Software Installation» menu, select the program installation package and right-click on it.
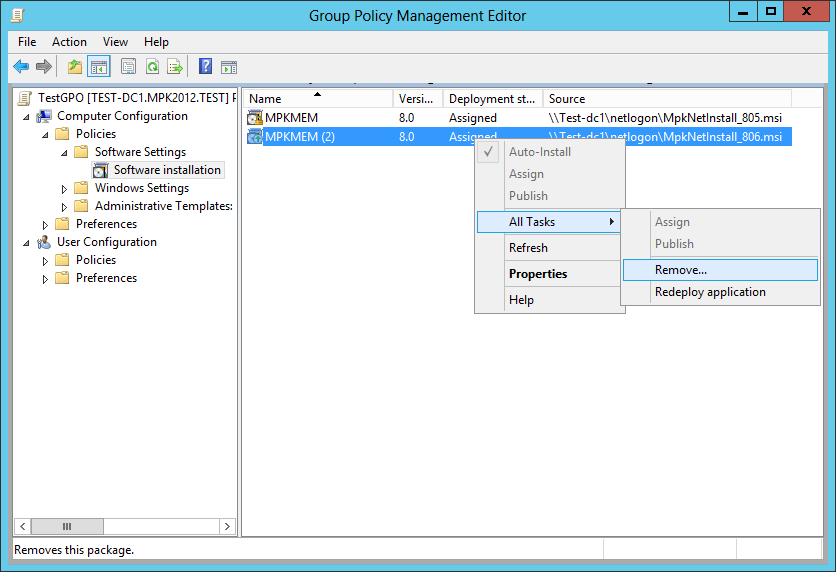
Select the «Remove…» command. This must be repeated for all packages.
- Choose to remove the program for all users and click «OK».

- Run the gpupdate /force command to update the policies.

Employee Monitor Installing Whithout A Domain
Installing
- Generate a network installer using the «File» -> «Create an installer» menu command.
- Copy
all installation files (MpkNetInstall.msi, key.bin and settings.bin) to
a single folder on the computer and run MpkNetInstall.msi. You will
need admin rights to complete the manual installation.
- Wait until the installation is over – and you are done.
- Connect the computer in the log viewer.
Upgrading
- Performed identically to installation.
Removing
- Generate a network installer with the «File» -> «Create an installer» command or use a previously created one.
- Copy all installation files (MpkNetInstall.msi, key.bin and settings.bin) to a single folder on the computer.
- Right-click on MpkNetInstall.msi and select «Uninstall».
- Wait until the uninstallation is complete.
Employee Monitor Installing Old Version (7.x)
How to manually install the software on non-domain network
1. Create an installer for the Refog Employee Monitor; click the menu «File» and select «Create Installer…»The following five files will be copied to the specified folder:
- MpkNetInstall.exe - program installer;
- logstart.vbs - installer to be run in the hidden mode;
- loguninstall.vbs - uninstaller to be run in the hidden mode;
- key.bin - license file;
- mpk.db - default settings file;
3. Using administrator privileges launch logstart.vbs on all computers
4. To open a network log, click the menu «File» and select «Connect to another computer…»
5. When viewing a log Refog Employee Monitor will ask for a login and a password for an administrator of that computer, which log you are trying to view.
To automatically install the software on the domain network:
1. Install the software on any computer on the network with the network administrator rights.2. Set up the watching parameters that will be applied to all network computers by default.
3. Create an installer for the REFOG Employee Monitor; click the menu «File» and select «Create Installer…»

The following four files will be copied to the specified folder: - MpkNetInstall.exe – program installer; - logstart.vbs – installer to be run in the hidden mode; - loguninstall.vbs – uninstaller to be run in the hidden mode; - key.bin – license file; - mpk.db – default settings file;
4. Copy these files to the domain controller common folder "NETLOGON".

5. You should add the logon script «» on the domain controller for every user you want to install "REFOG Employee Monitor" to. For this, open Control Panel , click the Administrative Tools icon, double-click Active Directory Users and Computers, right-click the user, select Properties and then add the script to the Logon Script field.

If the logon script has been already specified, you should add the following string to this script to run the installer in the hidden mode: "MpkNetinstall" /VERYSILENT /SUPPRESSMSGBOXES /NORESTART /NET This done, REFOG Employee Monitor will be installed and run on the domain computers as soon as the users log on.
Viewing logs on the remote computer:
You are able to view logs only under the domain administrator rights and having access to the shared system resources "C$", "D$", etc. of the domain computers.To open a network log, click the menu «File» and select «Connect to another computer…»
To open a local log, on the menu File select Local log
If you manually install REFOG Employee Monitor on every computer then to open a log the following requirements should be met:
- You should login to Windows using Administrator account
- Computer which logs you are planning to view should have exactly the same account as in previous step. Meaning login and password should completely match to login and password of Administrator account you are using to view logs.
How to open REFOG Employee Monitor? The hotkeys do not always help
1. Press Windows key and R key.

2. Type runrefog and press Enter.

How to start REFOG Employee Monitor automatically at Windows startup?
To start it automatically for all users, select «Users» and click the green button with a triangle
To start it automatically for a certain user, select the user from the list and click the red button.
Employee Monitor: advanced settings
From time to time, we get contacted by people complaining that they cannot connect to a remote computer using Mipko Employee Monitor. Unfortunately, such situations do happen because of the differences in network architectures, computer settings, user permissions and other parameters. We have compiled a list of recommendations that will most probably help you solve your problem and successfully establish a connection. Here they are.One.
Make sure that the script is installed and launched on monitored computers (just in case you missed something). The following instruction explains how it can be created and installed.The work of the script can be tested in the following way:
If the script was installed, you will find a folder called C:\Documents and Settings\All Users\Application Data\MPK (in Windows XP) or C:\ProgrammData\MPK (in Windows 7) containing logs and the executable file of the program. If the program is running, it won’t be possible to delete or move the executable file (with the *.exe extension).
Two.
Try adding the target computer using its IP address instead of its network name.Try navigating from the observer’s computer to C$, the hidden shared folder of the client system being monitored and make sure it is accessible under the current user without errors or issues of any sort. If it’s not, try looking for a possible reason and fixing it.
My Computer > address bar > \IP address or name of the client computer\C$ > Enter
If it didn’t help and didn’t solve the problem, carry on with the instruction.
Three.
1. For Windows XP/Server 2003Open the HKEY_LOCAL_MACHINE\System\CurrentControlSet\Services\lanmanserver\parameters key and add an AutoShareServer (for Server 2003) or AutoShareWks (for Windows XP) value equal to 1.
2. For Windows 7, 8, Server 2008, 2012
You need to enable network discovery and shared access to files and printers.
Open "Control Panel > Network and sharing center > Change advanced sharing settings". You need to activate the "Turn on network discovery" and "Turn on file and printer sharing" options.
After that, go to the HKEY_LOCAL_MACHINE\Software\Microsoft\Windows\CurrentVersion\Policies\System key, create a LocalAccountTokenFilterPolicy value of REG_DWORD type equal to 1 and reboot the monitored system.
3. If there is no admin password set on the monitored computer, you need to do the following. Make sure that the RestrictAnonymous DWORD parameter in the HKLM\SYSTEM\CurrentControlSet\Control\Lsa key in the registries of all monitored computers is set to zero. This is officially recommended by Microsoft.
In Windows 7 and 8, disable "Password-protected sharing":
Control Panel > Network and Internet > View network status and tasks > Change advanced sharing settings > General (current profile) > Password-protected sharing > Turn off.
If you see the following error: "Multiple connections to a server or shared resource by the same user, using more than one user name, are not allowed."
try adding the name of the computer to the user name. For instance, try using "testwin\testadmin" instead of "testadmin".
You can also try closing the log viewer, then opening the command line (Start->Run->cmd) and doing the following:
1. Run the "net use" command and find the computer you cannot connect to
2. Enter the following commands:
net use {computer_name or ip_address} /delete net use {computer_name or ip_address}\c$ /delete
3. Run the program and try adding the computer again
Make sure that all computers are in the same workgroup or domain. This is important and if it is not so, it may cause the problem.
If you still fail to connect after trying all of the above, please contact our technical support department - we will try to find the reason of your problems.
No comments:
Post a Comment